Faux Mosaic Box & Coasters

Materials:
• 1 - Stampbord™ 5"x5" Box Kit
• 4 - Stampbord™ 3.5"x3.5" Coasters (4-8 will fit in box)
• 1 pack - Elizabeth Craft Designs - Shimmer Sheetz™ - Yellow Iris
• Elizabeth Craft Designs - Be Creative™ Tape
• Ranger - Tim Holtz® Adirondack® Alcohol Inks: Wild Plum, Butterscotch, Lettuce, Pitch Black, Rust, Purple Twilight, Denim
• Ranger - Tim Holtz® Adirondack® Alcohol Inks - Metallic Mixatives: Gold
• Ranger - Tim Holtz® Adirondack® Alcohol Blending Solution
• Ranger - Tim Holtz® Adirondack® Alcohol Ink Applicator
• Painter’s Pyramid® - 16" VersaSpin™ 360
• Jacquard - Lumiere® Light Body Metallic Acrylic: Pearl Violet
• Loew-Cornell™ - Soft Comfort Glaze/Wash Brush #14550
• 4 - Shepherd® Surface Gard® Vinyl Bumpers - 3/4" (non-slip feet for box)
• 4 - Adhesive-Backed Cork 3.5"x3.5" (available at hardware and home supply stores)
• Envirotex Lite® Pour-On High Gloss Finish (optional)
• Envirotex Lite® Pour-On High Gloss Finish (optional)
• Craft Knife and Cutting Mat
• Ruler
• Drill
• Small Phillips Screw Driver

1. Choose Lumiere Metallic Acrylic Paint and Shimmer Sheetz in coordinating colors. (Note: One package of Shimmer Sheetz contains enough for one box and eight coasters.) Paint the sides of the lid, the bottom, and interior of the 5"x5" Stampbord Box Kit with Lumiere Light Body Metallic Acrylic. Use the VersaSpin 360 with Painter's Pyramids to hold the pieces while the paint dries.

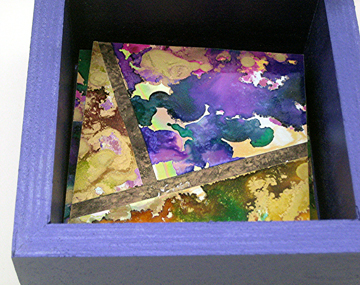
2. Using the Alcohol Ink Applicator, Alcohol Inks, Metallic Mixatives, and the Alcohol Blending Solution, alter the three 5"x12" pieces of Shimmer Sheetz. Use a different color combination on each sheet. Next, use the Metallic Mixatives and Blending Solution, leaving some of the original Shimmer Sheetz showing on all pieces to visually unify the three.

3. Using the Alcohol Ink Applicator and Gold Metallic Mixatives, color the sides of the coasters. Also Using the applicator, use Alcohol Inks in Pitch Black and Rust to dapple the top of the box and the 3.5"x3.5" Stampbord Coasters. These colors will become the "grout" in the Faux Mosaics.
4. Add the Be Creative Tape to the back of the Shimmer Sheetz pieces. Cut the Shimmer Sheetz up and peel off the tape backing, one piece at a time, to create mosaics on the lid of the box and on all coasters. Trim with the craft knife so the edges are smooth. (Note: Coasters do not need to be identical and do not match the lid of the box. Hint: If using 90-degree angles for all mosaic pieces as shown, repeatedly trim the Shimmer Sheetz with the craft knife and ruler keeping small scraps for other projects.)

5. Add adhesive-backed cork to the back of the coasters. Trim with the craft knife so the edges are smooth.
6. Attach the hinges, connecting the lid and base. Add non-slip feet to the bottom of the box. Place the coasters inside the box to complete your set!
(Wipe coasters clean - do not immerse in water.)
(Wipe coasters clean - do not immerse in water.)
Sealing Option: Use Envirotex Lite to seal the coasters and box lid. Let dry according to package instructions.
Designer's Notes: Give the set as a gift at a bridal shower. Surprise a recent grad setting up her first apartment. If you're hosting the shower, anniversary celebration, or housewarming party, make a coaster for each of the guests to take home as a favor. The box can fly solo, too. It's the perfect size for jewelry and memorabilia.
Hold onto all of the Shimmer Sheetz scraps! They're just right for turning small Stampbord shapes into faux mosaic magnets, frames, pendants, ornaments, Artist Trading Cards and other items.
A fun project, those colours look amazing :)
ReplyDeleteLove it Judi!!!
ReplyDeleteThe tiles look fabulous! Great technique!
ReplyDelete